Monday, 15 May 2017

S Range - Eqyptian Crimean War Cuirassier - Not everything works

Carrying on the more unusual units in the Crimea, .  Looking at the Ottoman War website,http://www.ottoman-uniforms.com/1854-till-1856-egyptian-crimean-war-turkish-foreign-auxiliary-contingent-cavalry I found drawings of an Eqyptian Cuirassier.

There doesn't appear to be much evidence on the uniforms or units of Egyptian cavalry in the Crimea, but the Cuirassiers were in Constantinople so it's not too much of stretch to have a unit in my army.

I had some spare Napoleonic Wars French Cuirasssiers and pondered using a Russian Guard head on one of their bodies to give me figure with a helmet.  Then I thought why not just convert the figure.  This is the result.  Not all conversions work the way you hope.  Not my best work but it was okay for me as these were always intended to be one-offs for my army and they pass the two foot test - i.e. from the other side of the table they look okay!
 

I cut away most of the horse hair plume with the wire cutters (snips)

Then I filed and cut away the rest of the plume and sanded it smooth, the same for the epaulettes. The biggest problem was how to make a representation of a crescent on the top of the helmet. I tried it using 'green stuff' and it looked more like a pair of ears you see on some of those wooly hats.  So I tried drilling a hole in the top of the 'helmet' and gluing in a piece of brass rod.  This gave me a secure fixing. I then used the pliers to squash the bit of rod that was sitting proud.


With some repeated squashing you get a thin flattened piece of brass. This can then be split to make it look like a crescent - not brilliant.  I was getting impatient and should have spent more time filing.  


The rest of the conversion was green stuff to pad out the trousers and make rolls on the edge of the cuirass. 

A quick sanding of the corners of Napoleonic blanket box turned it into a  roll.

He probably shouldn't have the belt and carbine but this is standard for all the S range cavalry so I thought I would leave it. It might have also been better if I have put some 'mesh' made of green stuff on the back of the helmet as a sort of neck guard?


I only intend to have a unit of six figures and made each one individually hence the slight variations.


Saturday, 6 May 2017

Jacklex 20mm Russians, Pathans, British and Indians fight it out

Jack came over and he, Bob and I had a game with his 20mm Jacklex figures.  

The scenario was that Russians were coming to support a Pathan uprising on the North West Frontier.  An initial force of one infantry regiment and a battery of artillery were in the main Pathan village with 2 brigades of infantry, Cossack and Regular cavalry and another battery of artillery moving to support.

The British made up of an Indian Brigade, one British and one Highland Brigade together with supporting artillery and cavalry were to take the village and force the Russians back. Jack and I commanded the Anglo Indian force, whilst Bob took charge of the Russians and Pathans.

Jack was unfamiliar with the rules so we played the basic Black Powder game moving in inches.  We played 'up the table' giving us a 7 ft long by 4 ft wide playing area.

The Russian starting position.


The Russian/Pathan front line formed along a walled field and some broken terrain occupied by Pathan riflemen.  This patch of rock and scrub land was to prove a major obstacle for the Anglo Indian force.


The Anglo Indian force started with only the Indian Brigade in line the British and Highland Brigades were in column advancing in support.


The Anglo Indian force need to take the initiative and Jack quickly moved the Indians forward with 3 moves.


The supporting British Brigade decided not to move and this in turn stopped the Highland Brigade from advancing up the road!  The Indians were on their own!

The Indians start to take casualties.


Bob struggled to get his Russian brigades moving 


Next move the British and Highlanders quickly advance to support the Indians


The Russians also started to advance.  Jack launched his Indian lancers in an attempt to stem the advance.


The high watermark of the Indian advance.  The Indians get to grips with the Pathans who were the front line.


The Indian cavalry suffered badly from the Russian rifle fire but still managed to get past their Break Test and plough home.  They couldn't survive the subsequent melee and broke and fled.


In the centre the Indian Infantry who had already suffered casualties from rifle and artillery fire broke after the melee.


Bob's Russian artillery and Pathan riflemen saw off the Indian battalions.  Only one Indian battalion remained in the line.  The rest were broken and fled the field.


The supporting British and Highlanders deployed to advance.


Bob moved forward his Pathan horsemen supported by his Russian cavalry.


My lancers charged forward to take on the Pathans.  Readers will recall from other games involving the lancers that Carstairs and Carruthers serve with this unit.  Both were awarded the VC after their heroics in an earlier engagement.  They were joined in this battle by their friend Arbuthnott. The lancers forced the Pathans to retire.  


Jack decided that having driven off the Pathans and the Russian cavalry withdrawing my lancers should charge the supporting Russian Infantry.  Carstairs, Carruthers and Arbuthnott with the rest of the regiment charged forward into a hail of Russian lead!


Somehow the lancers managed to make it. After the melee their were still there!


However, Bob and I thought this was an implausible outcome and agreed that although not broken Carstairs, Carruthers and Arbuthnott  should retire.


On the hill the British and Indian artillery batteries fired turn after turn to no effect!  It was only after the game that Jack and I agreed that we should have advanced the guns as they proved hopeless throughout at long range.


The Hussars followed up to hit the disordered Russian Infantry driving them back.


In the centre the British and Highlanders reached the scrub land and walled field.  The Pathans who had suffered from the earlier Indian assault were driven from the scrubs and the British and Russian Infantry were exchanging hot fire across the field.


But now Bob's artillery came into their own time and again they poured successful fire into the advancing British and no amount of rifle fire or long range artillery could silence them.  They just ripped into the British and Highlanders sending regiment after regiment back in disorder and fleeing the field.


The first of the British regiment leaving the field


Soon followed by others!


Jack looks concerned


Bob look pleased - possibly even smug?


Meanwhile, Bob's Russian Cavalry pushed back my disordered Hussars 


Bob then repositioned his guns to fire on the British troops closing on the village. Hitting them with close fire and driving them back in disorder.  Is there no depths to which the Russians will not plunge! 


In a moment of sheer bravado, Bob ordered his cavalry to charge home against the Highlanders on the left flank. The British who could have laid down some supporting fire to help their Scottish friends decided instead to lay more fire into an already weakened Russian Infantry regiment.  As a result the cavalry made it home forcing the Scots to retire. 


It was all up for the British.  The Indian Brigade was smashed, Several British regiments were fleeing the field and although the Russians lost one Brigade and the other was temporarily halted they retained the village.

The Russian artillery had been vital and although one battery was slow to get into action, once they both opened up and consistently found the mark the Anglo Indian forces were doomed.


Following the battle the Czar (Bob) made the unusual award of the Order of St George the Martyr Fourth Class to the officers and enlisted men of the artillery battery, who in the Czar’s words “performed with great heroism despite being under constant artillery and rifle fire from the British. They lived up to the inscription “for bravery” on the badges they can proudly wear at their necks”.

Courtesy of Wikimedia http://www.vippresent.ru/
The decoration was to be conferred solely “for exceptional prowess  displayed for the greater glory of the Russian arms.” It remained until its abolition in 1917 the most sought after decoration.

We had a good time and Jack was on form.  All the figures British, Indian and Russian forces were painted by Jack over 40 years ago and have stood the test of time.  All the lining of belts etc were done with a black pen.  Jack said it was quicker than trying to paint lines!   The Pathans which are also Jacklex were painted by myself over 20 years ago!

It was great to see so many Jacklex figures on the table and to realise just how many more there were in the boxes and could have been put out!

Thursday, 27 April 2017

28mm Pike and Shotte - The Portuguese take on the Japanese

Having used an earlier item to talk about the game we were going to play a gap in the calendar meant that we actually managed to play the game fairly quickly after I saw the table for the first time.

The object of the game was to take and hold a hill on the centre of the table.  We used centimetres rather than inches for movement, but retained the ranges in inches - made sense to us in terms of the game play.

So here is the AAR.  I took on the role of the Commander of the Japanese forces - the main Warlord and Bob commanded the Portuguese.  I diced for my command level which could have been 8 or 9, but I of course only managed to get an 8.  Bob also commanded on an 8. 

Despite these high command totals the game got of to the usual sluggish start with 'brigades' (loose expression for the 3 Japanese Warlords and the Portuguese groups) spending time just looking and discussing the meaning of life. Only my Asigaru; some unarmoured peasants; some even worse peasants; a unit of archers and some fanatical samurai on my left flank moving forward supported by my cavalry on the extreme left.


Bob's cavalry advanced and after 2 moves of doing nothing, so did his pikes and arquebusiers (very slowly).  Bob's cavalry then just stalled and sat watching my infantry advance.


After a bit of a chat we agreed that if they were going to just sit there and with a unit of fanatical Samurai as part of my force it was not unreasonable for these fanatics to charge the stationary cavalry.  So that's what I did!


The cavalry did better than expected but lost the combat, the Samurai having 4 units in support to the cavalry's none.  The resulting Break Test saw the cavalry roll bad dice, break, and leave the table.


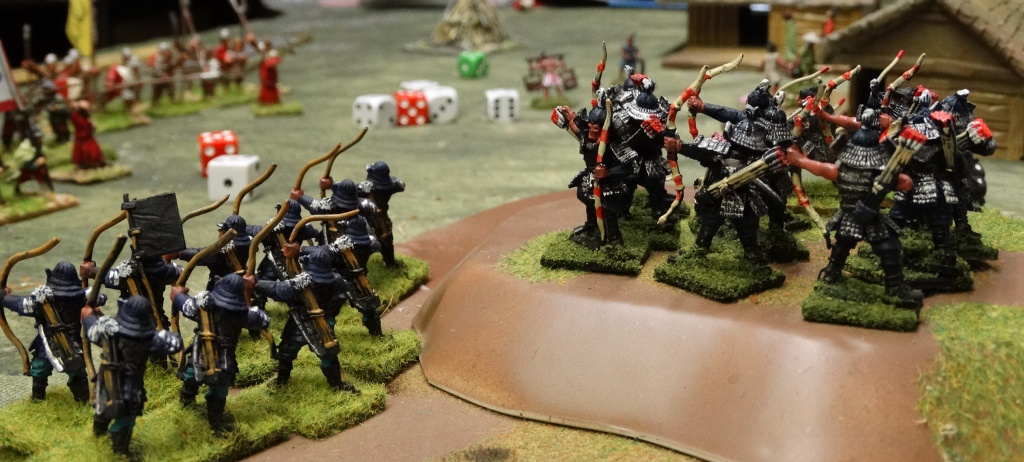
In the centre, my brigade including Samurai archers, more ordinary archers from both the left and right flanks managed to scale the hill and take up position.  


Whilst all this had been going on Bob had been quietly unloading 2 of the ships guns and taking up position.


I fancied my chances with a charge by my Samurai Cavalry to get at these gunners.


 My charge failed and the cavalry suffered.  Not badly but were forced to retire.  They then took another hit in the next round and I pulled them back out of range and they played no further part in the game.  This left the guns free rein on my infantry who possessed no weapons to return fire .  Fortunately, their fire proved annoying but on the whole ineffective.  

At last Bob's advancing infantry came in range of my bows. 


The Samurai archers delivered a devastating volley on the first of the advancing pike units with 3 sixes! and further hits from the other supporting archers saw the pikes stopped in their tracks.

On the right Bob moved forward with a 'brigade' of heavy infantry with two handed cutting weapons.  We didn't have enough units, so we had to 'imagine' the other 2 supporting units. I wasn't worried as I had my Monks who were equally fierce-some!


These boys would ignore everything until they became Shaken! 


First round went to the Monks causing disorder but not breaking Bob's infantry. 


No problem I thought it is only a matter of time.  Oh yes, time was all it took.  Bob rolled 4 sixes!! added to the casualty they had suffered in the first round and the Monks were shattered and fled the field!  All in the space of 2 rounds!


Somehow, the peasants supporting the Monks managed to survive their Break Test and were left standing as 'the end of the line' and facing Bob's heavy infantry.  Disaster loomed!!

On the left in the meantime Bob had managed to deploy his arqubusiers and I was starting to take the odd hit on my Asigaru and peasants.


My archers on the hill came to the rescue inflicting the odd casualty here and there . However, I couldn't just stand and take hits so my infantry got to grips, the fanatical Samuari coming to the fore again.


I didn't have it all my own way and the melee's were close I only won them because of the numbers of supporting units.  One unit of Bob's unit finally broke, thanks to some earlier casualties caused by my archers.

But this seemed a side show to what was happening on the other flank.  With my Monks disappearing into the sun set, Bob had heavy infantry and pikes against my lowly peasants and archers.  Forward came the heavy infantry into a hail storm of arrows 3 hits and no saves.  I then managed a Blunder Test which sent my peasants forward fortunately just the one move and Bob did the same, this time charging forward into them.  


Heaven know how, but the dice were with me another kill on the heavy infantry and no killing blows on my peasants spelt doom for the heavy infantry.  They failed their Break test, as did the supporting unit and with one unit already broken and leaving the table the 'brigade' was beaten.  Leaving the Japanese masters of the field.

The archers on the hill made all the difference.  They managed to stop the advance of the Portuguese infantry who couldn't get to grips with them and whose slow start gave me the chance to get to the hill first. When the Monks fled I think we both thought it was over for the archers on the hill as they were ripe for the taking.  But from 4 sixes to wipe out the Monks to not a single telling blow on the peasants was just amazing (poor dice and good saving throws).  Victory from the jaws of defeat!  

Not sure I understood some of the Japanese weapons or knew how to pronounce them and Bob forgot to get his sailors of the ship which was an extra unit that could have been in the game, but it was good fun and a chance to use figures in a different scenario.

The bulk of the Samurai are Warrior 25mm figures, supplemented by Dixon, Westwind and Black Hat figures. The civilians are from Japanese and Vietnam ranges. The gate is from Grand Manor and the screens are paper downloads from Wargames Vault. The deck, ramps and dock are scratch built by Jack.

The Portuguese are Bob’s TYW army. The Portuguese standard Bearer and escort are Conquistadores from Outpost Wargames and the cavalry are assorted border reivers. The ship’s guns and the crew who never got off the ship are by Newline Design.

The Portuguese stats were taken from the Italian Wars lists, while the Samurai, Monks and others were all found in an army list on the Warlord Games’ Pike & Shotte forum.