Friday 29 March 2019

1866 Reinforcements - S range conversions

In between the lulls in the recent battle of Idonowhere, I was filling in the spare time with painting and casting up reinforcements for both the Austrians and the Prussians.

The Saxons
I had in my spares box both enough casting for 2 Regiments of Saxons using my 16 figures to a regiment.  This is the first.  Although these are listed under the Franco Prussian War by 1870 the Saxons had adopted the Prussian uniform and the only real difference as far as I can see was a green tunic for the artillery.  These 'peaked capped' Saxons work for both the Saxon and Bavarian troops in the 1866 war.  With a khaki paint job they would pass for Mexican regulars or even Japanese troops for the Russo Japanese War.

I had already made the drummer conversion for John Cunningham so I was saved some work.  However, for some reason I didn't make a standard bearer.  Since I had some spare Bavarian standard bearers it was a simple head swap to create one.

  
I could have simply painted some Prussian 1870 gunners with green tunics but the pictures I had seen showed them in a peaked cap in 1866 so I did the usual one off head swap to make a couple of gunners.


Bremen Fusilier Infantry

The Bremen infantry in the picture below wear a kepi and look very much like an ACW figure so I used my home made ACW infantryman mould to cast up a unit.


One of the problems with this high port pose if that whilst it is easy to remove the rifle and convert the figure to a standard bearer using the same technique to create a drummer by bending the right arm to hold a drumstick looks a bit odd, so I settled on giving them a bugler/hornist made from a British CW rifles bugler with a kepi head swap.


I have given them the Napoleonic Flag from the Warflag site because I could find anything else at the time.  

However, later I stumbled across an interesting blog site  http://preussische-armee.blogspot.com.  If you look at the November 2013 entry you will find lots of different flags for Prussian Regiments amongst them was this for Bremen.


This flag was created in September 1866 the war finished in August!  I might still swap it for the Napoleonic one!

Brunswickers


I used the ACW figure but with the CW French Chassuers head - Jack made me a mould.  As above, I made the master without a blanket roll, I later added these using lighting cable and painted it grey with black 'ties' (see below).


Although, these were 'easy to paint' (black spray, 2 coats!) I don't like the unit particularly for some reason  They look too Napoleonic.  Again on the blog site listed above, there are some Brunswick flags.  


Backpacks and Blanket Rolls.
When I made my 'ACW infantryman mould' and 'Plumed Shako figure', I removed the blanket roll from the top of the back pack as I mentioned above.  This was so I could manage the different types of blanket rolls/tin boxes which are shown in various illustrations for the 1866 period.  These tend to make these 'kepi/plumed shako infantry' look different for different duchies/states.  Some have the blanket roll wrapped around the backpack, similar to the WW1 infantry or, the more conventional roll on top of the backpack.  Making the figures without blanket rolls meant that rather than making multiple moulds I only have to fit the blanket rolls.  The ideal would be 'greenstuff' but I struggle with this and getting them the same would be a problem - for me at least. 

I wondered about using a different material and settled on a spare bit of 3 core lighting cable which I stripped down and which one cut to length makes reasonable blanket rolls for the top of the back pack.


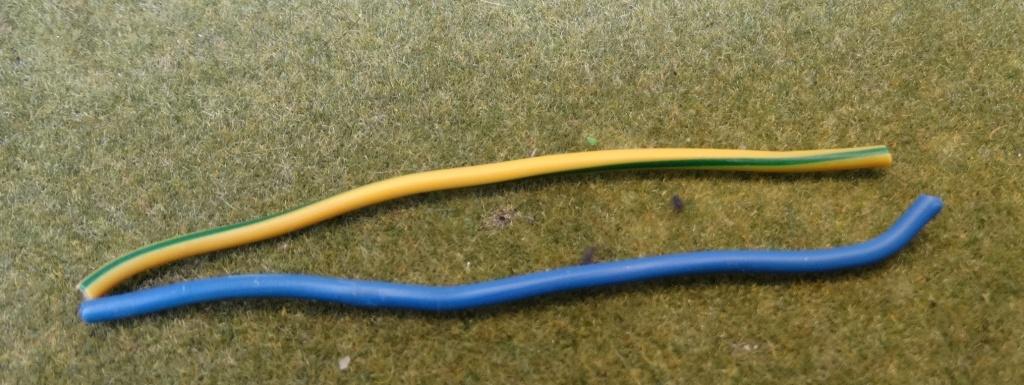
However, it was too thick for the blanket roll which wraps around the backpack.  After a few trials of different things, I settled on the leads off an old set of earphones - or you could use new ones from the '£ shop' or equivalent - which I used for the Nassau Infantry blanket rolls (see below). They are far from perfect but at a distance and once painted, they pass muster for me.


Nassau

This is the same plummed shako figure I used for the Brunswickers but painted as a Nassau Fusilier but with a blanket roll around, rather than on top of, the back pack.  


The Nassau Fusiliers complete.


Friday 22 March 2019

28mm Pike and Shotte - Ottoman V. Poles . The set up

Having finished our mammoth 1866 game, both Bob and I thought it was time for a change.  With the improvement in weather here in the UK, we were able to start to make use of Bob's wargame room/garage.

Bob has some large and lovely eastern and eastern European armies and it seemed an ideal opportunity to get them on the table.   I particularly like his Polish army and the Turks can match them in both style and grandeur. So it was a fairly obvious choice.

Bob developed the following scenario:

'Gothrin the mad has been riding along the Polish frontier, leading a force of light, irregular cavalry and infantry. A poor commander whose position is due to his father being Grand Vizier, he is returning to the Turkish base of Stara Hrad in occupied Poland. His father Etrogul the Brutal, Grand Vizier and commander of the army, plans to celebrate his son’s raids by coming out of the fortress and saluting him and his troops as they pass by and into the fort. He will have his own person guards in attendance but the army will be inside the fortress. For the first time in years he will be a target of the Poles

The Poles must kill Etrogul – if possible they can also kill his son Gothrin. It does not matter what losses are sustained if Etrogul is killed'.

I went over to see the set up and take some pictures.  

The Ottomans


The Poles


 The Poles also had reserves in the forms of Winged Hussars and Pancerni and light cavalry.


We tried a couple of moves to test the Polish deployment.  The Ottomans had low command levels ranging from 6 to 8.  Whilst the Poles all had a command level of 8.

The Polish infantry advanced and began to move from column to line.


 The Polish reserves entered 'en masse' and the next move with Gothrin trying to make a mad dash to the safety of the fortress with his bodyguard he was caught by a massed charge of the Polish winged hussars, who also hit the Wallachian infantry.


Needless to say both Gothrin and the Wallachians lost.  Resulting in a very short 'test'.  

The scenario has lots of potential for a good game but we needed to address some issues.  The first was getting the Ottoman forces out of the fortress.  The unit nearest the gate failed a command test and blocked everyone else.  We think we have solved this one.  The other was the size and positioning of the Polish heavy cavalry reserve.  Again we have sorted this out and reset the game for another try next week.  Look out for more pictures of Bob's forces!


Friday 8 March 2019

Austrians and French clash at Idonuwhere – The final day


After a week or so's break Bob and I returned to the clash.  Things were reasonably balanced at this point.

The French attack began with the breaking and pursing of the 12th Austrian Uhlans and their final rout.


This left only the Hesse Kassel Hussars on my right facing a unit of ‘blown’ Dragoons, a unit of Carabineers and a fresh unit of Dragoons!!  Needless to say that Bob took full advantage launching his Carabineers.  The only saving grace was that they already had some damage which gave the Hussars a bit of a chance.  Miraculously they managed to only get pushed back and not broken!


To their right The French began their assault on the earthworks with the fresh centre brigade failing to get enough of a move to charge, but moving up to close range with the Baden infantry defenders!


Further to the right the Papal Zouaves joint the Guards in the assault on the Austrian earthworks.  This spelt disaster for the defenders who failed their break test and fled.


It wasn’t all going Bob’s way, some devastating artillery fire saw the French Zouaves break and leave the table.


I rapidly formed my remaining Austrian regiments into a firing line with the intention of blasting the Papal Zouaves and forcing them to withdraw from the earthworks so that I could retake them.  The road to heaven is paved with good intentions, needless to say the firing was hopeless!


I had more success on the extreme left with my Cuirassiers seeing of the last of the French Cuirassiers.


A second attack by the Carabineers saw the Hesse Kassel Hussars finally routed and forced to flee.


The French central brigade finally managed to charge the earthworks and the Baden infantry and Hesse Kessal Jagers offered pitiful closing fire!


On the Austrians left, the failure of my Austrian regiments to stop the French resulted in return fire which saw one of the Austrian regiments break leaving the wing in tatters.
Things were now looking particularly grim for the Austrians and their allies. The French Guards brigade had breached the earthworks on their left and there was the risk that they could attack the defenders from the flank and rear.


At this point it was time to start to save the army!  The town gates were flung open and the Austrian army, what remained of it,  managed to 3 moves for almost every unit that could move and melted away. The Sachsen Meiningen regiment also sought safety using the other gate


Only the Baden Infantry and Hesse Kessal Jagers remained engaged in their tussle with the French infantry, eventually managing to throw them back after dogged hand to hand fighting.


Meanwhile chaos ensued in the town with units becoming muddled.


While the French found themselves masters of the table!


All of the Austrians and their Allies were conversions; either individual or homemade moulds in the case of the Allies with some 188 infantry and 42 cavalry and 6 Artillerymen forming the army.  

The French were a mix of original S range Crimean War figures with additional recasts and the Franco Prussian War French were all recasts.  The Papal Zouaves were homemade conversions.  The French totalled some 200 Infantry, 54 cavalry, 3 Mitrailleuse and 4 batteries of artillery and 18 gunners.