Showing posts with label Minifigs S Range. Show all posts

Wednesday, 8 April 2020

S Range Projects that won’t happen


Unfortunately, my cancer means that I am unlikely to have the time, or frankly the desire to complete various large scale projects that I had started/thought about, but I thought you might like to see some of the ideas.  I am adding units to my existing armies instead which seems a more sensible use of my time as I will hopefully once we are released from house arrest mean I can use them.

Italians

Sardinians
The first of these projects was the Italian Wars of Unification.  I already had the Austrians and French so to some extent it was a matter of producing some of the Italian states.  The Sardinian Lancer I made for John Cunningham’s Crimean War range gave me some cavalry and the Bersaglieri a start with the infantry.   I had also made an Italian General to lead my army.   I then created this ‘master’ for the Sardinian infantry based on a picture from Uniformology.  The French 1840’s Infantryman which John already sells also works for Italian infantry of various states and the French Guard from the CW range can also be used for Italian forces.


Papal States
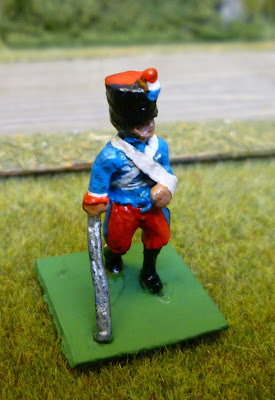
I have a 25mm ‘S Range/mid range minifigs’ Zouave figure which makes an excellent Papal Zouave with the backpack swapped, or it can be left as it is.  


The actual uniform can be confusing both in the shade of grey and the jacket piping.  I addition to the 2 pictures below I have also seen them painted all grey!


I opted for a straight grey with red piping.  I decided to cut away 'civil war' backpack the figure comes with file the back flat and superglue what I call the Jacklex backpack on the figure which more closely resembles the backpack in the pictures above.  


You can now get this backpack from jacklexminiatures.com.  The Papal Zouves were disbanded and many went to fight in the Franco Prussian War on the side of the French were they formed the Volontaires de l'Quest. 

The picture below show then with the fuller French backpacks.  To get this figure in the past I had do a head swap of a kepi head onto Zouave figure. 


In fact I have since discovered that jacklexminiatures.com have a separate backpack for the Foreign legion which does the job and is much simpler, again just remove the Civil War back pack and glue on the Foreign Legion one.  I think this is a nicer figure than my original conversion.


This figure has proved to be very versatile from being a ACW Zouave to an 1870 FPW figure.


I have a mould for the original ACW figure and many casting which are no longer of any use!  I intend to offer them to John  Cunningham, and assuming he wants them you may be able to order from him.

Schleswig-Holstein War
Having already got a Prussian Army I thought that I could build a Danish force for the first and/or second Schleswig-Holstein Wars.  A search on Google left me totally confused as to what uniforms were for which war.  I started with this picture.

This is listed as Danish troops returning after the First Schleswig Holstein War.  They looked very ACW but with a different backpack.


So I converted a Union ACW figure to make both an infantryman and a Grenadier and changed the backpack for a Jacklex one.


I then came across picture of infantrymen in red jackets and bell top shako and lost the plot about what I should be trying to make and shelved the idea. The Friekorps troops I was going to use I turned into civilians and were the subject of another blog.


Monday, 17 February 2020

S Range Prussian Pioneers - Conversions

Whilst fiddling about making the casualties for my Ambulance service, I came across a couple of conversions that I had started with the idea of making a small unit of Prussian Pioneers.  I wasn't wild about these but thought I should just go ahead and painted them up.

The figures are based on the 2 Prussian Artillerymen and one Prussian infantryman.  The conversions are fairly obvious.  


Given the figures I used,  you can do exactly the same conversions to create Bavarian or Wurttemberg Pioneers although I have struggled to find any pictures or uniform details for either.  The only uniform I did come across was a Saxon Pioneer which is the same uniform as the Prussians but in green. 

The 'shovels' are from Irregular Miniatures SW20 Farm Implements.  Gripping Beast also make a set of tools SC62  12 tools for £2.00, as do Essex Miniatures X52 which includes Hammers, shovels and picks 8 tools for £2.50. Prices exclude p&p.  I am sure there are others out there, but these I have used in the past.  One set of tools allows you to make up a number of 'pioneers'.

My latest messing about is to make a third gunner for the Prussians, Bavarians and Wurttembergers artillery crews. I always think they look a bit odd with only 2 gunners/poses.  This one will be holding a rammer and will be a conversion of the gunner with the shell.


Friday, 14 February 2020

FPW Ambulance Update- Wagon Driver RNX1


I mentioned in the previous post that I had spotted the Russian Wagon driver in fatigue dress RNX1 in the Minifigs catalogue and wondered if this would be an easier way of getting drivers for LLeido wagons (or indeed any other wagon) than cutting 2 figures apart as I had been doing up until now.  

Of course as soon as I finished my Ambulance conversions I discovered that I already had a LLeido 'box' wagon in another wargames box!! Anyway, at least if provides an opportunity to show you what the figure looks like on a variety of Lleido wagons.


Brewery wagon. I removed the barrels to use as barricades

A Bavarian head with the comb removed might
make a passable fireman's helmet?
Basically the figure works and doesn't look out of place with S range.  I think the driver may supposed to be mounted on a horse rather than the seat of a wagon as his legs are quite spread apart.  However they can be squeezed together with a pliers to make it look better.

The fatigue dress means that the figure has no pouches, cross belts or weapons and has shoes rather than boots, meaning he is ripe for conversion of simply having leaving and being painted.  The only thing that strikes me as odd is the hat, which looks very formal.  A quick file to get rid of the top 'rim' of the hat and or filling it down would probably work and give a more fatigue cap lookas would a straight head swap .  The raised right hand looks as if it should be holding a whip.

You can use this figure as a driver for any wagon and with very little work or a simple head swap for almost any nation in the CW or FPW or with S range Napoleonics.


This is the figure on an Airfix wagon.  The seat needs to be raised by 2mm either with card or as in this picture a small piece of laminated floor tile to allow the figure feet to sit properly.

Monday, 10 February 2020

FPW Ambulance Part 2 - S range Casualties and make your own FPW Ambulance

Not sure if it is to do with my condition and the frequent trips to hospital but I seem to have become a bit fixated on Ambulances!  

The more I looked at the anniversary model of the British Red Cross FPW ambulance, the more obvious it was that it was merely a standard Lledo standard model with transfers.  I therefore went on Ebay and found 2 Abels of East Anglia Bros models unboxed and with no drivers being offered for 99p plus 2.90 P&P.  I put in a bid of £1.00 and won them for 99p.

I created a template for the windows based on the original FPW ambulance and cut it out of an old Christmas card.  Easier to cut than cereal packet and thinner.  I have included all the measurements if you want to give it a go yourself.  You will need some extra lengths of 3mm wide strips of card to run along the plan front face of the model, you just line these up with the window frame and one at the bottom edge. I use Evostick wood glue to fix the card to the model.

Red Cross Original
My Conversion of Abel's Wagon still to fit reins!

Drivers.
I am not entirely sure where I got my model Minifigs carriage and passengers, but you can buy just the passengers who I have converted into drivers, limber riders etc.  There are 2 different models; WAGX3 is 2 British Napoleonic Officers – Open coach and WAGX4 two French Officers  - Open coach.  Needless to say for my purposes it was off with their heads.  I sacrificed one to make a seated figures for the Foundry Prussian gun.  For that exercise I didn’t take that much care separating the 2 figures using snippers to cut them apart and losing the arm of one of the figures in the process.  Sensibly, I never threw that part away and he has made an appearance as a Prussian cuirassier casualty (see below).

With a bit of effort with a scalpel, some emery paper and a file I was able to separate to two figures completely without damaging either and this gave me two drivers, albeit one looks like he is signalling a right turn!


Since then looking at the Minifigs 25mm on line catalogue, I came across a picture of a Russian Wagon driver in fatigue dress RNX1.  I have ordered 2 of these in the hope that, whilst they are not S range, they don't look as if they are modelled on the same lines as the more bulky 'Minifigs'.  In which case I (and you dear reader) may be able to be able to do a simple head swap without all the cutting about.   

From the various illustrations on line, 'uniforms' for these ambulance drivers and staff seem to be crosses between civilian and military uniforms, so it is a bit of free for all.  I stuck with the British blue uniform for the drivers but somehow managed to give them new heads with Kepis which, when I painted them, left them looking a little American Civil War-ish.  May change them. 

Casualties
Having created these ambulances (why does anyone need 3?)  I felt there was a need for some casualties to place around them.  It was back to my scarp box and collection of headless and arm less figures.  Starting with the French General mentioned above.  I drilled and bent a bit of florist wire so he could rest on the ground and then moulded some green stuff around the wire to give him an arm.  No matter how many times I use this compound I am hopeless with it!  The arm is too thick but after a lot of unsuccessful fiddling I gave up and decided that paint deceives the eye!  I gave him a Prussian Cuirassiers head which saved me having to do too much alteration to the body.


The other figure I had a lot of was the FPW artillery man with shell.  Probably the easiest figure to work with.  I literally cut away the base with my metal cutters and then filed to remainder back to the figures boots.  File away the shell and you can just leave it at that.  His hands are clutching his stomach.  I felt I wanted to reposition his left right arm so using my hand drill I drilled a series of holes to help me get a scalpel into position to cut the arm free.  A tip here,  drill through the arm at the shoulder into the body first as this helps to reposition the arm later.  Separating the arms also allow you to create a sling on the arm left attach to the body. 


If you are really feeling adventurous you can use exactly the same figure to make a sitting pose.  I merely cut the legs away from the body again using my cutters and filed things smooth; super-glued it onto a base and filled the gaps a little more successfully with green stuff.  Again I gave him a sling made of cooking foil.  

A very simple conversion using this figure is to remove the base; file back to the boots; file away the shell;  file the back flat and fix it to a base.  


You can cover the figure with a blanket made of cooking foil, or ‘cigarette paper’ or a piece of old rag if you fancy it.

Feeling really cocky,  I decided to try to make some walking wounded.  I was going to try to use the same figure and attack it with a soldering iron but my nerves are still not up to it.  So I had look at my spares and wondered if I could us a cavalryman?  After all he has two legs and they are sort of at a stride.  So again, out came the metal cutters and my large and small files and some emery paper to remove the saddle cloth etc.  I drilled his arm at the shoulder as described took it off and repositioned it.  I squeezed the legs together a bit with a pair of pliers and bent one back, again with pliers, to give the appearance of a walk.  I was going to get rid of the sword and give him a cane to rest on, but the sword gave me instance balance on the figure so I left it.  Again, the figure is clutching the reins , i.e his stomach.  To disguise this I gave him a sling.   I padded out the gap between the legs with green stuff.  I started with a Bavarian Cavalry head but thought it didn't work with the body.  I should stress that all the tools I used are very crude and easily available at any DIY store and may also account for the end result being not perfect.


 So I swapped for a French Hussar's busby head.  


Fortunately, the French Hussar model has ‘baggy trousers’ not sure I could do it with tight fitting cuirassier leggings, but I am going to give it a go as I sort of fancy a 'personality/command ' stand with perhaps a dismounted and mounted officer set up.  

So my original project has grown!


What is even worse is that I have come across some pictures of Ambulances in the Crimea War!!  In particular Dr. Smith's New Hospital Wagon.


By courtesy of the Welcome Foundation (CC)
This may be a step tool far!

Sorry about some of the pictures, my camera has developed a fault which I can't clear and will probably need to go back to Sony for repair.

Tuesday, 7 January 2020

Conversion of Franco Prussian War ambulance for 25mm S range


Not being in the right mind set to start a new project as such I have been tinkering around. I read about the British Ambulance service in the Franco Prussian War.  This was a volunteer service funded by public and private donations. 

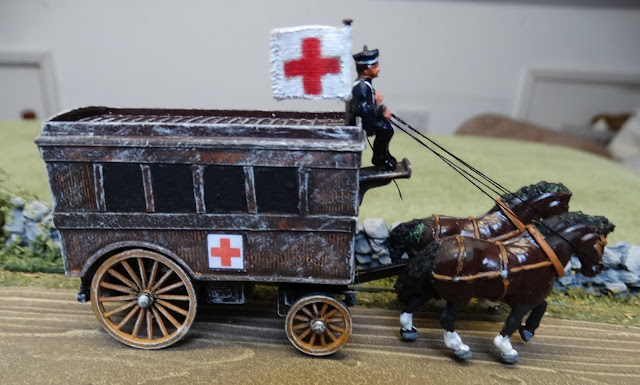
In 1991 To commemorate the Service the British Red Cross launched a ‘limited edition’ model by Lledo of a Horse Drawn Ambulance as used in the Franco Prussian War.  I picked one up on Ebay for a couple of pounds.  Whilst it is said to be carefully recreated from material held in the British Red Cross archives, the model owes much to the Lledo models used for other commemorative and publicity models.  I decided to use this as the basis for a model of a Franco Prussian War ambulance just to pass the time and keep my hand in at doing some S range conversions.


I used the material I had to hand.  Foam board and cardboard and it tuned into a bit of a dog’s dinner.  I struggled with the wheels amongst other things and decided to abandon the idea. 


One of the reasons for making my own version of the ambulance is because the rear wheels on the LLedo model are all wrong based on all the line drawings of the time.  But having made a hash of my own model,  


I went back to the Lledo model which was very ‘flat’ in terms of detail and decided to add strips of cardboard to give if a bit of depth.  


I also decided to get rid of the ‘universal driver’ which Lledo use on all there models substituting it for an S range conversion I made.  I was going to use a Prussian figure but then remade it with a British ‘cap’ more in line with the description I was able to find on line.  The horses had the usual LLedo ‘bobbed tails’ and poorly defined manes so I used a bit of ‘green stuff’ to make the tails and manes a bit more distinctive. 


I couldn’t find anything about the colour of these vehicles.  I didn’t like the ‘creamy yellow of the LLedo model and so opted for a more ‘wooden look’.

Lastly I drilled through and added some ‘cotton reins’.  Why I don’t know, but threading the cotton through the drill holes was an absolute pig.  These I ran back to the ‘driver’s’ hand and added a whip in his other hand for good measure.  


I then made up a couple of foot figures again I am not sure why.  The ‘officer’ is a Prussian gunner officer with a British head’.  The uniform is supposed to be based on the British artillery undress uniform.  The ‘Nun’ is made from the S range CR10 Nap Camp follower with bottle & bag.  I just filed down the hair to give a flat surface for what looks a bit like a ‘wimple’.


I decide not to put the ‘Service of the English Ambulance’ logo on the side so it was a bit ‘more open’ to who and where it was used but I made up wording in the right size to retro fit if needs be.  

Anyway it is just a bit more nonsense and passed the time. May even go back and try to rescue my early attempt!