Friday 8 July 2016

FPW S Range Black Powder game

Having more or less finished my Prussians and allies and a couple of true S range Franco Prussian War French units, Bob and I decided to try the figures out using the Black Powder rules.  These are a mix of the original figures and a lot of the Recast 25mm S Range figures which are available from John Cunningham.

The French consisted of 4 Infantry Brigades each of 2 regiments (they are a mix of Crimean and Franco Prussian French figures).

  1. Guard (elite) and Zouave regiment (skirmishers/sharpshooters)
  2. Marine and Chasseur regiment (elite/sharpshooters)
  3. 2 Line regiments
  4. 2 Line regiments
1 Brigade of Light cavalry, 
2 light guns and one Mitrailleuse

The Prussians had 3 Infantry Brigades 

  1. 3 regiments of Prussian Infantry
  2. 1 regiment of Bavarians and one of Silesian Rifles (skirmishers/sharpshooters)
  3. 2 regiments of Wurttemberghers
1 Brigade of 3 units of Light Cavalry
1 Brigade of 2 units of Heavy Cavalry 

2 guns ( 1 Heavy and 1 light).

The Prussian front lines at the start of the game.

Heavy cavalry of the left flank and Light cavalry on the right


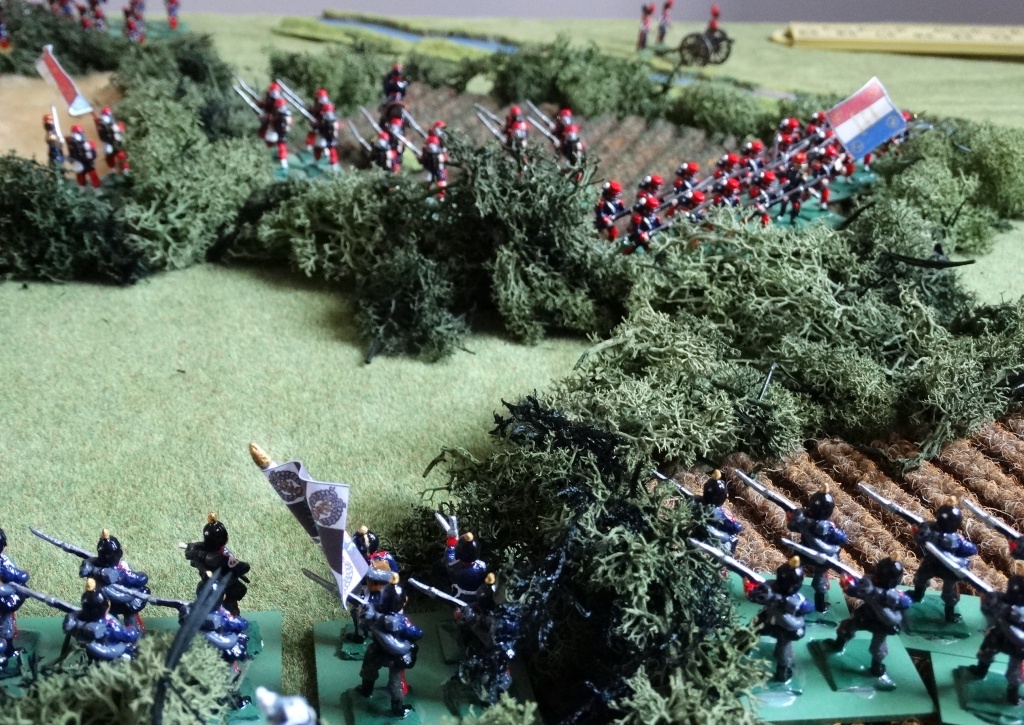
Looking from the French Lines


The terrain was broken by fields and hedges (bits of carpet and moss!)


Since neither of us had much affinity for either of the protagonists, Bob choose the French leaving me with the Prussians.  I had anticipated that Bob would wait for me to come onto his forces given the extra range of his rifles but no, the French 'elan' came to the fore and he advanced his units (where possible).  I came forward to close the gap.


My guns made ready to open fire having a longer range than their French counterparts.  All the guns on both sides either missed or the casualties were saved!


The Guards and Zouaves took up position on the crest of the hill facing the Wurttemberghers.


The French settled in the hedgerows and proceeded to take shots at the Prussian (not very successfully) before the range closed. The French Chasseurs crossed the stream to add their firepower to the French Line Infantry, taking advantage of the re-roll on a missed shot to inflict casualties of the Prussians.


In response, the Prussian brigade formed a firing line and were, eventually after a couple of failed commands, supported by the Light Cavalry Brigade which threatened the French left flank.


The Wurttenberghers meanwhile climbed the slope to confront the Zouaves.  They were supported by a Bavarian light gun which might have well have stayed in the melting pot.


After much standing around the Bavarians and Silesians decided to advance towards the flank of the Zouaves. The French gun brought up to support the Guards and Zouaves and it was as equally useless as the Bavarian one!


The Guards watched on.


The Mitrailleuse, support by 3 ladies, also watched and waited for the enemy to come within range, which an unfortunate Wurttembergh regiment eventually did!  In these rules, you roll one dice and keep going until you miss.  4 casualties later and the Mitrailleuse finally stopped.  This forced a command test which the Wurttembergers passed only to get a halt order.


Bob sensing the opportunity presented by the stalling of the Wurttembergers brought up his light cavalry brigade to support the Guards.


With all the 'elan' they could muster, and to my surprise the French Infantry charged into my Prussian regiment. The Prussians failed to stop the charge with their volley and a melee ensued.  The French already had a couple of casualties from earlier rounds of firing and lost the melee, breaking and leaving the table.


The Marines on the French left flank in response to the advance of my Light Cavalry reversed their flank and brought up another light gun.  The first casualty of the Bavarian Light horse toppled over! 


The Mitrailleuse opened fire again not as successful but still enough to see off one Wurttembergh regiment. It wasn't enough as by now the Zouaves had come under fire from 2 regiments and broke.  Their place was taken by the Guards who also found themselves out gunned and retired, covered by their cavalry. 


What are hear you ask of my Heavy Cavalry Brigade?  What indeed!  Having failed order after order they finally advanced on the last but one move.  It was enough to put off the French Light cavalry, but not enough to stop a final round from the Mitrailleuse taking down one of the lancers!


The Prussian held the field at the end of the game with the French withdrawing. 


 One French Brigade didn't move for the entire game as they failed their command orders repeatedly.  I know this is in line with the rules but it is a waste of time, paint and lead.  I think that in future we may limit the number of times a unit can continuously fail to move, to perhaps twice or three times? After which it can make a single move before retesting again in the following turn?

It was great fun seeing all these S range figures on the table (over 300 infantry and cavalry) they do not match up to current figures, but as I have said before they have a charm all of their own.  

Friday 1 July 2016

Race to the River - a Black Powder Pike and Shotte game

After trying Black Powder with my ACW armies we decided to try Pike & Shotte with Bob's TYW figures.  Jack Bob and I met at Bob's to play the game in his 'war room'.

 Bob's figures are based for another set of 18th century rules and he used 4 figures on a 50mm x 50mm base with 3 bases making an infantry regiment. Cavalry are on the same 50mm square bases, with 2 figures on a base. Three bases make a cavalry regiment. Guns are mounted individually.

The Scenario
The Austrians (circa 1700) have learnt that the Turks plan an incursion, and have sent a force to capture the bridge and ford over the river. Infantry and cavalry can cross the river with a penalty but the bridge and ford are essential for artillery and wagons. So the Austrians must hold both crossings to deny the Turks access.

Both sides had approximately the same force:

Austrians
Turks
2 x Brigades of 3 infantry regiments
1 x Brigade of 2 Janissary regiments
2 x brigades of 3 horse regiments
1 x Brigade of 4 levy infantry regiments
1 x brigade of 3 dragoon regiments
2 x brigades of 3 horse regiments
1 brigade of 2 batteries of medium guns
1 x brigade of 3 light horse regiments

1 brigade of 2 batteries of medium guns

All the Austrians were regular – the Turks varied from Elite to Levy
All the stats were taken from Pike & Shotte with the Austrians using the 1690 British values. Although we’ve seen house rules and amendments we used the rules straight from the book.

Jack who was to command the Austrians, met Don Featherstone back in the ‘60s and he was pleased and intrigued to see a wargames device from that period. Don and others advocated a sheet should be placed down the middle of the table so that both sides could deploy in secret. Bob had placed a screen which went from across the table and completely hid his Turks from our view. Something we haven’t done or seen on decades. 

'Is that me?'  asked Jack scrutinising the 28mm Austrian C in C command group. 


The Austrian forces


Bob's Turkish opposition


Turkish Spahis of the Porte led by the Sultan's Guard - the Muteferrikas regt - elite heavy cavalry.


Turkish C-in- C  Grand Vizier with Standard Bearer


Feudal Spahis - irregular heavy cavalry


Grand Vizier with 3 horse tail tug  only the Sultan has 4 horse tail tug.

Bob won the initiative and as the Grand Vizier/commander failed to inspire any of his troops (poor dice)  except the Muteferrikas regt Spahis of the Porte led by a Bey with his one horse tail Tug to advance.  They alone made a dramatic move to find themselves occupying the fordable river.


Having watched Bob fail to move his troops forward, Jack obviously took a similar view and with miserable dice throws saw most of the Austrians fail to move.  Only the Austrian horse and an infantry brigade on the right advanced.


Greater disaster befell the Austrians with Jack ordering his dragons to advance and then rolling a double 6 resulting in a 'Blunder Test' followed by a roll of 2 causing them to retreat 1 move away from the enemy. This took them off the table and out of the game!  'What happened there?' was Jack's response!  


The next turn found Bob still failing to inspire most of his men to advance, with only the irregular infantry advancing a double move and a single creep forward by the  Janissaries.  Jack's second infantry brigade woke up and advanced and his cavalry brigade reached the river.


Not to be out done, Bob rolled a double 6 with the result that the elite Spahis of the Porte fell back a move.


Finally some action, a heroic charge by the Austrian cavalry brigade on the left saw them surge into the Turkish levy.  At last the Austrian gunners having pushed their guns forward to get into range had targets! Disaster as Jack rolls yet another double six Blunder Test and one of the infantry brigades moved left right in front of the their own guns, accompanied by yet another 'What happened there?' and a lot of shaking of heads and more pointing to the play sheet.


Bob rallied the Spahis of the Porte and they advanced supported by the Janissaries.


The irregular light cavalry who had been skirmishing on the Turkish right had been forced back.


The Austrian infantry moved through the wood to the banks of the river.


The Saphis of the Porte launched a charge but fell short. Giving the Austrian infantry a chance to give a round of fire.


On the left flank the Levy have held the Austrian horse but are shaken. The feudal Saphis support the levy by charging into the Austrians horse.


On the right an Austrian cavalry regiment outflank the Saphis of the Porte and crash into their flank.


Another regiment of Austrian horse outflank the Janissaries and take advantage of their open flank.


Despite bravely fighting on two flanks the Saphis of the Porte morale allows then to hold on.


The irregular horse archers finally flee the scene.


With the irregular infantry and saphis being 'destroyed' by the Austrians, the remaining Janissary regiment and the Turkish guns form a firing line on the flank to form a fighting retreat.  


An enjoyable game even if Jack wasn't entirely sure on occasions what was happening. As usual we mis-read bits of the rules on occasions but managed to go back and work it out.

All the Austrians are by Hinchcliffe figures, the Turks are from a range of manufacturers including Hinchcliffe, Essex, Irregular Miniatures and Lancashire Games.  

Jack is much more of a colonial/ACW/Mexican revolutionary wars man but enjoyed this foray back in time from his wargaming interests.