Bob has a large Malburian/SYW Austrian Army to
take on his equally large Turkish forces, but decided he would like to use them
to tackle a European opponent. He has
been busy painting up a Bavarian and allied army and this was our first try
using them. Again we stuck with the
Black Powder rules.
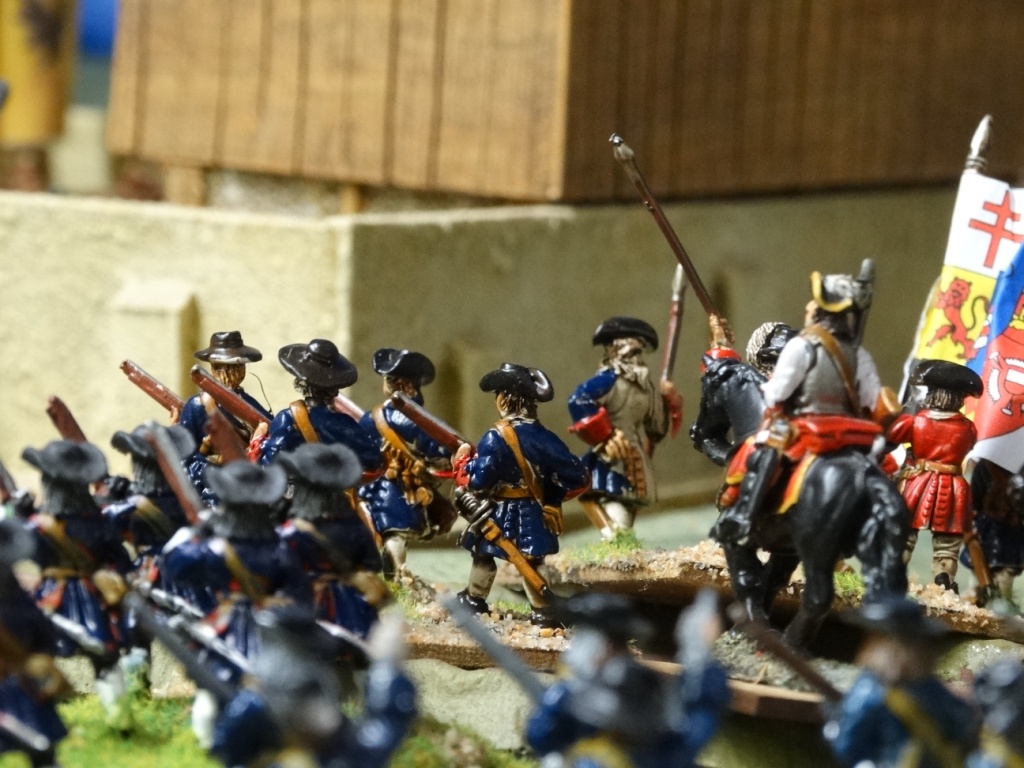
I commanded the newly painted
Bavarians and Hesse Kessel allies whilst Bob took charge of his Austrians. We decided that my allied troops should all
count as newly raised and take the
appropriate first move test. Moves and
ranges were at 50% of those in the rules and we again limited ourselves to one
move if the command roll was passed.
This helps with narrower tables.
The Bavarians and Allies


The Austrians


Whilst these two forces prepared to
do bloody battle a local resident sat in the church grave yard contemplating his
muse.

I won the initiative – although you
wouldn’t know it based on how few men wanted to advance – and moved forward my
screening light cavalry in the centre and the Hesse Kessel forces moved to engage
Bob’s Grenz infantry holding the farmstead on his left flank.


Bob sent forward his own light
cavalry for the first clash of the game, resulting in my cavalry fleeing the
table. Not the best of starts from my
point of view!


He also advance his heavy cavalry
brigades in the centre towards my Bavarian infantry


And brought up another unit of Grenz
infantry to support their colleagues in the Farmstead

My next turn resulted in much more
movement on the part of my troops. On my
extreme right I sent a cavalry brigade to swing around the Farmstead towards
Bob’s left flank hopefully in a flanking movement. Unfortunately they stopped
in range of the Grenz infantry who managed to disorder one of the regiments,
leaving it lagging behind its colleagues.

In the centre my Bavarians deployed
out of their columns to make some impressive lines and a first fire role disordered
one of Bob’s heavy cavalry units.

I charged forwards with a Brigade of
Cuirassiers towards Bob’s light cavalry and the heavy cavalry to their
left. The light cavalry evaded leaving
our two units of heavy cavalry to slog it out.
The first round was inconclusive.


However, I was able to throw in some
fresh units of heavy cavalry catching Bob’s cavalry in the flank and breaking
them.


Elsewhere Bob’s heavy cavalry
prepared to charge into my waiting Bavarians and allied troops. Forcing the herd of sheep - who were to play an
unlikely, but important role later in the game - out of the way.


Due to some pathetic firing by the
Bavarians and their Allies I was unable
to stop the charge and the Austrian horse surged home.

They performed heroically against
the Bavarians driving them back, but had less luck with the Hesse Kessel llies who were
stout in their own defence.

In the meantime the farmstead was
still under attack by Hesse Kessel infantry and my cavalry continued their flanking
movement. At times this looked like a
complete sideshow but it was to prove important in the final analysis.

I was able to swing my second line
Bavarian infantry to engage the flank of the Austrian heavy cavalry pushing it
beyond its stamina level and causing it to break.

The Hesse Kessel infantry having performed
so wonderfully in the first round of their engagement with the Austrian heavy
cavalry collapsed, broke and fled.

The centre of the table was now
becoming devoid of forces, the Bavarians had been pushed back to the tables
edge – save for one regiment, Bob’s heavy cavalry were leaving the table


All I had to do was push forwards
with my Cuirassiers who had pulled back after their victory out of range of
Bob’s artillery. At this point the herd
of Austrian sheep struck. I rolled to
try to charge forward and one of the dice ricocheted off the sheep – or the
sheep hit it - to give me a second 6. A
Blunder Test which in turn sent my Cuirassiers off the table into oblivion!
Although Bob still had 2 brigades of
infantry fully intact the cavalry I had sent in their flanking movement
effectively pinned them back on the start
line. If they moved forwards they
risked being caught in the rear.

At this point we worked out that the
Austrians would be able to withdraw, but couldn’t push the game to a conclusion
and my Bavarian infantry had taken a mauling.
The Allies surprisingly performed well and the initial ‘newly raised troops test’ proved a good
addition.
Although both sides had artillery it
really didn’t make that much difference with only the occasional hit being
made.
We still made the mistake of
thinking of hits on a unit being ‘casualties’ and removing figures. For example I hit Bob’s heavy cavalry in the
flank part of the unit – 2 figures – turned to face the attack, I rolled my
dice and inflicted 7 hits. Bob rolled
and couldn’t save 4 of them so we just took the 2 figures off and forgot about
the extra hits. In fact they should have
counted towards Bob’s total stamina score for the unit to be counted up as part
of the subsequent Break Test. In the our
old rules it was about percentage of casualties affecting moral. Another lesson learnt!
On question dear reader, we tend to
move as Brigades rather than regiments.
In any subsequent firing if a 6 is recorded, is the entire Brigade
disordered of just the unit that was in the line of fire? We just count the regiment, meaning the rest
of the Brigade can advance. Is this
right?
The Austrians are the same as mentioned in other posts on this blog. The Bavarians are in part from Hinchliffe and Irregular Miniatures. The Hesse Kessel Allied troops are mainly restoration figures from Parkfield Miniatures. Bob tells me he had to go out and buy Windsor and Newton's Indigo especially for these figures. Jack made the church from a picture Bob supplied an is based on an actual 17th century Romanian church.
The Austrians are the same as mentioned in other posts on this blog. The Bavarians are in part from Hinchliffe and Irregular Miniatures. The Hesse Kessel Allied troops are mainly restoration figures from Parkfield Miniatures. Bob tells me he had to go out and buy Windsor and Newton's Indigo especially for these figures. Jack made the church from a picture Bob supplied an is based on an actual 17th century Romanian church.
Thanks for the full account, I enjoyed the narrative and the pictures. Re disorder, only the target unit will suffer the disorder .... not the whole brigade.
ReplyDeleteBut note - a disordered unit cannot be part of a brigade order, I have always taken that to also means that if the disordered unit would normally be critical to ensuring that all units of the brigade were within 6" of another unit of the brigade, then the disordered unit could break that continuity, so that effectively the brigade from a 'receiving a brigade order' point of view, could in fact be split into two parts and need two orders rather than one.
Hi Norm
ReplyDeleteThanks for the clarification, that's the way we have played the games to date, so it it great to just get our thinking confirmed. Many thanks for taking the time to look and post. It is much appreciated.