The last post of 2017 . Merry Christmas and a Happy New Year.
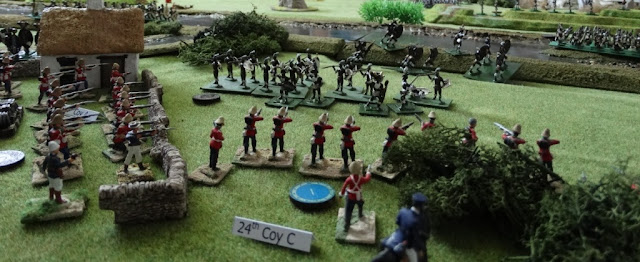
About 40 years ago Bob painted a Zulu army which consists mostly of Hinton Hunt figures, together with Airfix natives from the Tarzan set (10 boxes worth!), and some S range Minifigs and British red coats – Hinton Hunt and Rose Miniatures, including a couple of nice conversions he did at the time. These he passed to our mutual friend Stuart Asquith who in turn added some other figures.
About 40 years ago Bob painted a Zulu army which consists mostly of Hinton Hunt figures, together with Airfix natives from the Tarzan set (10 boxes worth!), and some S range Minifigs and British red coats – Hinton Hunt and Rose Miniatures, including a couple of nice conversions he did at the time. These he passed to our mutual friend Stuart Asquith who in turn added some other figures.
Some 30 years ago they got passed to
me and I added some Jacklex Zulus, together with some ESCI Zulu plastics. In that time Bob and I have played with these
figures once or twice I think, largely because we didn’t have any suitable and easy to follow
rules. We have ‘The Battle of
Kambula 1879’ –Simple Wargame Rules for a demonstration game on 7th
June 1975! –.and did try TSATF (I think) at some point.
However, we have been using the Black
Powder rules recently and they have an example of a British and Zulu engagement
so we thought we would give them a go.
So out the figures came from their boxes. Over 300 Zulus and 50 British Redcoats, a
unit Minifigs S range lancers and some Jacklex Boers as colonial troops and 4
mounted red coats as a unit of small unit dragoons, and a handmade 20mm Jacklex
Japanese Field Gun (don’t ask why).
Bob commanded the Zulu forces and I
took charge for the British. I set the game
up in my loft on my 6’ x 7’ table. We
used the rules from the book so to speak allowing full movement. The Zulus had 16 regiments - 2 of 40 figs and
1 of 50 which were counted as large units there were 2 units of skirmishers
with smoothbore muskets. The left and right ‘horns’ came from villages
at either end of the table with the Chest in the centre between the two.
I set my infantry out in companies
along the river bank with the aim of stopping the Zulus on the far bank. One company was posted in a walled farmstead, there were a small unit of marksmen on an ‘island’ in the river and the
colonial cavalry and the lancers protected the wings.
 |
| This unit did a lot of moving about, winding up in the wrong place! |
 |
| The horse holder and standing firing figure denote the unit is dismounted |
The Zulu’s commander was a veritable
giant with a cigar and a top hat! This
is a plastic figure which must be at least 35 years old. To look at him you would think it is an
Airfix model because of the sculpting but he is a 25 mm figure. Bob can’t remember where he came from. Anyone
recognise the make?
The Zulus took the initiative and
the Right Horn made up of the Airfix regiments (the Sharp Pointed and the
Dividers) moved forwards slowly
On the right things were as slow as
on the left. The Zulu riflemen advanced
on both the left and right preparing to take up positions on the hills to
support their advancing regiments.
The Zulu advance was a lot quicker
than I envisaged and my troops opened fire.
E company were clearly spooked by the advance and missed when firing at
the two large units approaching them!
At the same time one of the Zulu
rifle units reached the opposite bank of the river and opened fire! Several birds flying high above ducked down
for cover, but the British survived!
C coy found themselves cut off from headquarters
and fighting for their lives.
And still Zulu units came
forwards. Fortunately for me the rapid
advance had slowed with the left and right horns still only advancing one move compared to the centre and providing some respite to pull troops back. In a vain and heroic attempt to stall and
throw back the Zulu right, the 17th lancers launched a charge on the
Sharp Pointers who were wading up the river.
Coy B failed to stopped the Zulu’s
Tree regiment who fell on them. The British classification of ‘Steady’ enabled
them to pass the first break test and hold the Zulus but they then crumbled and
were destroyed.
The Zulu sweeping advance caught the
British gunners who were, cut down in a one sided fight
Having thrown themselves against one
of the largest Zulu units the Lancers although causing casualties were held and
thrown back being destroyed in the process
Things were not looking too good for
my troops at this stage. In the centre A coy somehow managed to hold off the
Snake regiment - the largest Zulu unit - being saved by their Steady status. However, on their left C Coy scored a stunning victory
throwing back and breaking the Zulus to their front. Capt Horatio Caruthers RN in a sheer piece of
tactical thinking got three moves, wheeled D Coy and charged them into the flank of
the Snake regiment. This was enough to
see the Zulus main force break and flee.
A coy was equally mauled and forced to retire.
Again relief was only temporary as
the Zulus flung in their best Regiment against the farmstead. Caruthers led his men into the farmstead to bolster the British defence.
The Zulu Tree Regiment high on their
destruction of B coy and the British gunners rushed forwards into the barrels
of G Coy. Good firing and even better
saving dice saw them stand like oak trees and fall upon the British. However, their accumulated casualties from the
earlier engagements and those inflicted in this melee were finally too much and
they broke and fled.

In a final twist the Zulu left and
right horns eventually got moving. The Right Horn regiments managed a
double 6 blunder another 6 gave them a charge move and a 3 saw them get 2 moves to the front bringing
them across the river for the first time.
The remaining Zulu regiments in the
centre found themselves under concentrated British rifle fire and retired.
 |
| A camera shy Caruthers at the end of the game leading forward C coy |
At this point we decided that this
was a least a first day win for the British, but enough of the Zulus regiments
on the wings still remained intact thanks to their slow advance for there to be
a substantial Zulu force available to be reorganised for a second days fighting. The British meanwhile had seen one company
and their gun and lancers destroyed and all the other companies taking some
casualties or on the verge of breaking, but still there.
The BP rules worked fairly well and
we had a good enjoyable game lasting a couple of hours. Good fortune favoured the British because the
Zulu command throws were a bit all over the place and Bob couldn’t bring all
his forces to bear at the same time which might have been curtains for the British. It was nice to see these old figures back on
the table after so many years. I noticed
when cropping and enlarging the pictures that some paint is missing here and
there, I hope you will forgive them and be proud that so much has remained in
place!


